最近因為在玩 P2P 的東西,所以需要一台 24/7 的電腦來跑。
剛好 GitHub Education 之前有送 DigitalOcean $50,就先拿來用了。
怎麼在 DigitalOcean 建立 Droplet 就不說了,新建立好像可以直接匯入 SSH Key,就不用手動加 SSH Key。
OS: Ubuntu 16.04.1 x64
root 連到 Linux Server,建立一個新的使用者。
add user whatever將使用者加入 sudo 群組。
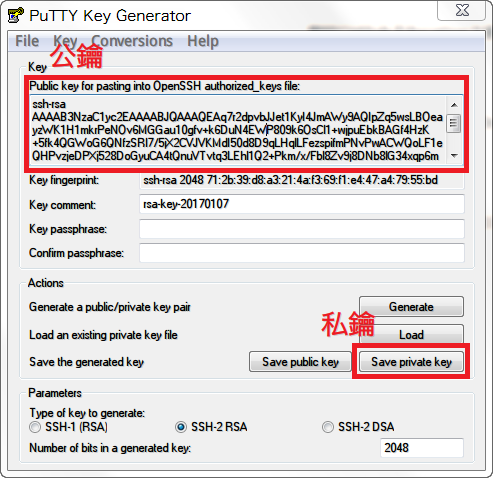
gpasswd -a whatever sudo使用 PuTTYgen 建立公私鑰,也可以在 Linux 上用
ssh-keygen指令建立。
登入剛剛建立的新使用者,在家目錄建立
.ssh目錄。su - whatever mkdir .ssh chmod 700 .ssh新增
authorized_keys檔案,並將公鑰內容貼進去,Ctrl+X存檔。nano .ssh/authorized_keys chmod 600 .ssh/authorized_keys輸入
exit切換回root,修改這個檔案。nano /etc/ssh/sshd_config拿掉這幾行前面的註解
#。RSAAuthentication yes PubkeyAuthentication yes AuthorizedKeysFile %h/.ssh/authorized_keys將
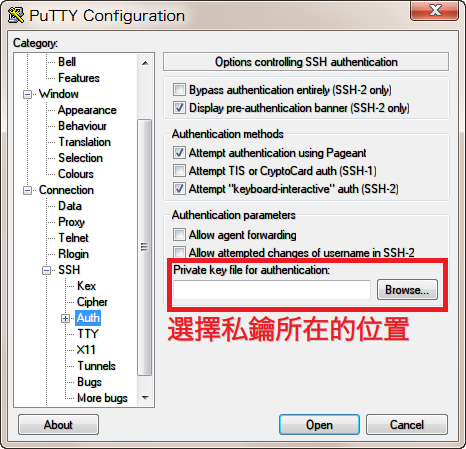
PasswordAuthentication設置為no,就不能用密碼登入嚕。PasswordAuthentication noCtrl+X存檔後,重啟服務。service ssh restart接著就可以在 PuTTY,用剛剛存下來的私鑰做驗證登入了 (不用密碼)。


因為公鑰是存放在 whatever 的家目錄,所以只能用 whatever 登入。
要用 root 登入的話就要在 /root 做同樣的事情,或是調整 sshd_config 的設定,不建議啦。
參考資料: