之前文章提到,部落格的分支有兩個,hexo 及 master,在 hexo 分支寫文章,之後使用 hexo deploy 部署到 Github 的 master 分支上,確定沒問題的時候再將原始碼 push 到 hexo 分支。
但本機還需要安裝 nodejs 以及 hexo 才能使用 hexo deploy。
現在有了 Travis CI 之後,就可以只專注在寫文章上,不用再去思考或是回想 hexo 的指令如何下,流程就會變成以下:
在本機寫完文章,直接將原始碼 push 到 hexo 分支上,接著 Travis CI 會幫自動做 hexo deploy 的動作,自動部署回 Github。
連結 Travis CI
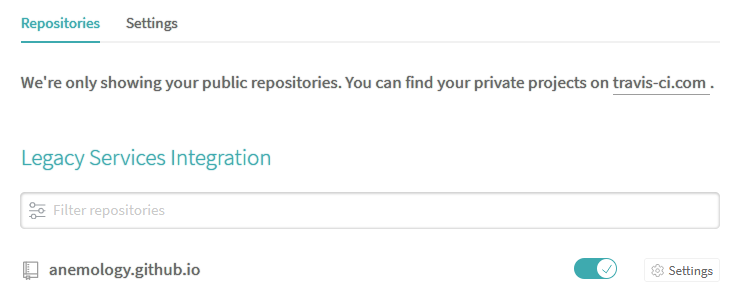
直接使用 Github 的帳號登入 Travis CI,將部落格 repo 的開關打開,如下圖, Travis CI 會在我們每一次 push 到 Github 時自動跑建置或測試。

取得 Github Token
因為部署之後需要 push 回 Github 上,Travis CI 需要額外的 Token,來做這件事,在 Github 上產生一個 Token 供 CI 使用。
Settings → Developer settings → Personal access tokens → Generate new token → Note 可以註記是 Travis CI 使用 → Select scopes → 只要選 public_repo 就夠了 → Generate token
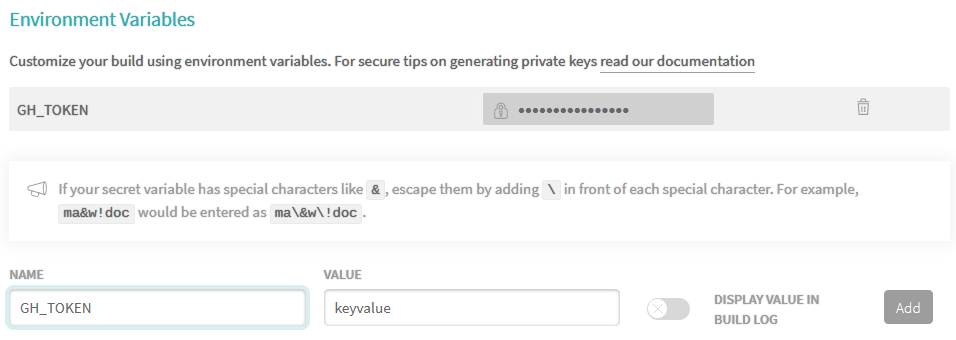
然後會出現一段英數字混雜的 token,複製起來貼到 Travis CI Repo 設定的 Environment Variables 的 Value 位置,Name 為 GH_TOKEN,按下 ADD。

看到很多文章,以前 Travis CI 設定的這些敏感資訊,因為會顯示在 log 裡,需要額外加密。但現在 Travis CI 都直接做好了,像是環境變數等等,在 log 內會變成 [secure] 字串,就不用擔心洩漏的問題。
編寫 Travis CI 設定檔
Travis CI 的設定檔名稱是 .travis.yml ,是告訴 Travis CI 要做什麼事情,放在網站原始碼的根目錄下就可以。
# 使用 nodejs
language: node_js

# 指定 nodejs 版本
node_js:
  - "10"

# 設定需要快取的資料夾,減少往後建置時間
cache:
  directories:
    - node_modules

# 只在 hexo 分支提交時進行動作
branches:
  only:
    - hexo

before_install:
  # 設定時區
  - export TZ='Asia/Taipei'

install:
  # 安裝相關套件
  - npm install hexo-cli -g
  - npm install

before_script:
  # 替換 hexo 設定檔 deploy:repo 的網址,使用 token 進行身分認證及提交,GH_TOKEN 為剛剛設定的 Environment Variables
  - sed -i'' "s~https://github.com/anemology/anemology.github.io.git~https://${GH_TOKEN}:x-oauth-basic@github.com/anemology/anemology.github.io.git~" _config.yml
  # 替換 hexo 設定檔 deploy:message 的值,這樣就不用每一次都要去改 deploy 時的訊息,如果用預設的 site update 就可以不用改
  - sed -i'' "s~CommitMessageWillReplacedByTravisCI~${TRAVIS_COMMIT_MESSAGE}~" _config.yml

script:
  # 清理 hexo 資料夾
  - hexo clean
  # 建立 public 資料夾
  - hexo generate
  # 因上一篇文章提到的,在不同機器上進行 hexo deploy,紀錄會不見,這邊先將 master repo clone 下來到 .deploy_git 資料夾,就可以保持原先的 commit 紀錄
  - git clone --depth 1 -b master https://github.com/anemology/anemology.github.io .deploy_git
  # 進行部屬
  - hexo deploy
總結
這樣之後每一次寫完文章,只要將原始碼 push 到 hexo 分支上,就可以自動部署啦~ 再也不用記 hexo 的指令了。
或是可以直接在 Github 上對應位置新增 Markdown 檔案,按照 hexo 文章的格式撰寫完,也會有一樣的效果。
但要注意用 Github 新增檔案的時候,commit 訊息不能填下面的 extended description,在建置的時候 ${TRAVIS_COMMIT_MESSAGE} 那行會出錯,因為 commit 訊息有兩行。 (個人踩雷經驗,或許重新改寫一下 sed 寫法可以解決。
參考網址
Hexo git deployer removes commits history? Let’s do something about that!